Wednesday 14 January 2015

Science for kids - Slime

Everyone likes slime! And it's easy to make, in its various forms.

Cornflour Slime:
All you need is cornflour (made from actual corn - maize - not the "wheaten" version you can get in Australia, which is made from wheat), water, some colouring, a bowl and a spoon. The process is:
  1. Pour cornflour into a bowl,
  2. Stir in small amounts of water until the cornflour becomes a thick paste. I prefer to have the water coloured at this point, as it helps to more effectively spread the colour throughout the slime.
And that's it. Try stirring the slime slowly (should be easy) and then quickly (should be almost impossible). Then try punching it. I employed a professional hand model for this video.


    Cornflour slime is a shear thickening non-Newtownian fluid - the viscosity of the slime increases as the shear rate (how quickly you stir, how hard you punch) increases. This is because the slime is a suspension of corn starch. The corn starch molecules are large and jagged and when stirred slowly, the molecules have time to move past each other, lubricated by the water. When a large force is applied, the molecules are jammed quickly together and the liquid does not flow - it becomes solid-like. You can keep it for about a week in the fridge before it starts to smell a bit like vomit. You may need to add a bit of water each time you use it, and stir it in slowly (you won't have much choice).

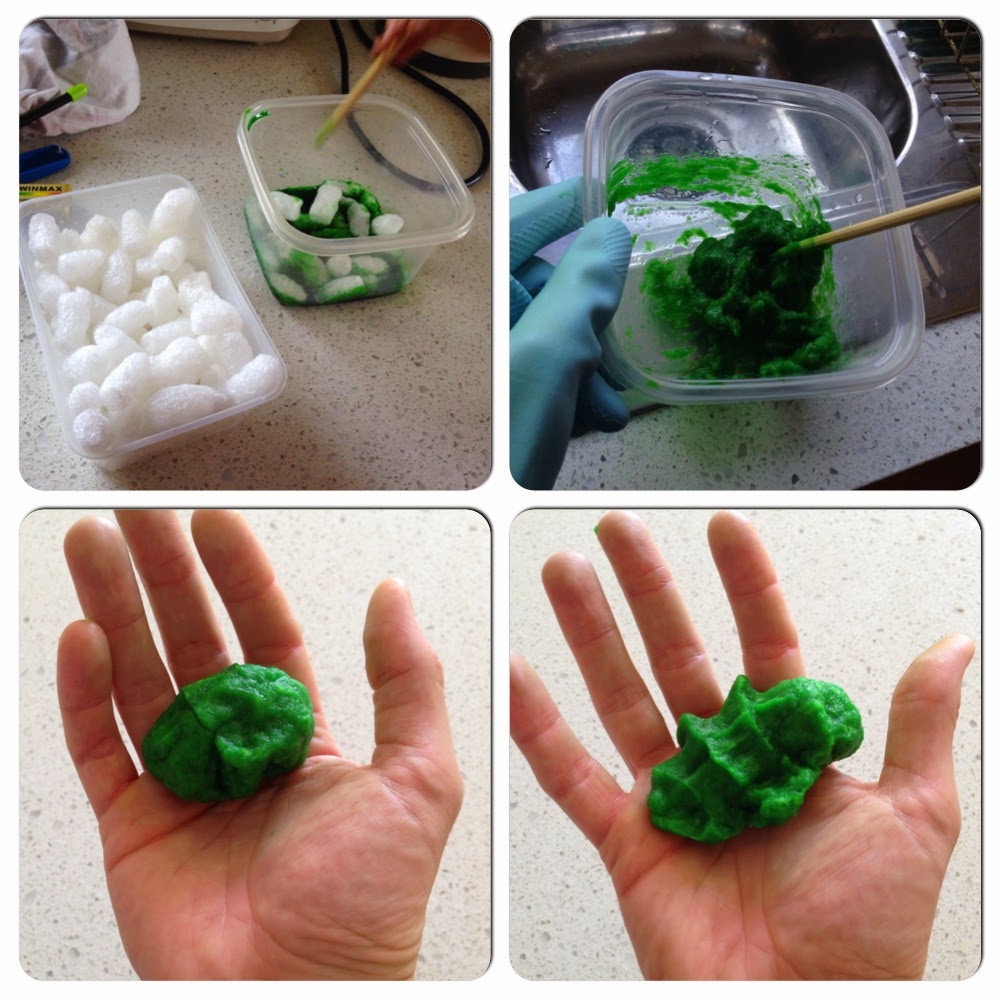
    Packing Peanut Slime (Borax Slime)
    A less cool, but nonetheless fun to make, slime is made from packing peanuts - the stuff used to protect fragile objects when you mail them, move house etc. Packing peanuts are generally made from starch but also contain PVA - polyvinyl alcohol. Place about 5 mL of water in a cup and add about 8 packing peanuts and stir. They will start to dissolve. Continue to add the peanuts until it starts to become thick, and then some food colouring.

    At this point, you need to have gloves on (and eye-wear if you have some). Add 1 mL of 4% sodium tetraborate solution (borax) and stir. You may have some in your laundry as it is used for cleaning clothes. Your goo will now start to become slimey. Once you can make a solid ball out of it, start to wash it with water to wash away any extra borax. After doing this, you can handle it with bare hands.


    Polyvinyl alcohol is a polymer - a long molecule with repeated subunits (monomers). The borax cross-links the polymer chains; that is, it bonds one polymer chain to the next. As you add more borax, more crosslinking occurs making the slime thicker.

    There is a similar slime you can make with PVA glue, although in this case the PVA stands for polyvinyl acetate as opposed to polyvinyl alcohol. The process is the same - the borax provides the cross-linking between the PVA polymers, except in this case the monomer contains an acetate (CH3COO) rather than an alcohol (OH). More on this slime here.

    Saturday 10 January 2015

    Science for kids - Elephant Toothpaste

    Gooey stuff is always pretty exciting for kids. This is called elephant toothpaste because, well, that's what it looks like. The experiment is fairly simple. The ingredients are:
    • 125ml 6% Hydrogen Peroxide (ask at the chemist)
    • 1 Sachet Dry Yeast (powder) + a few tablespoons of warm water
    • Detergent
    • Food colouring
    • Empty bottle
    • Funnel
    You might want to wear gloves and goggles when handling the hydrogen peroxide. Add the hydrogen peroxide, a few drops of food colouring and a good squirt of detergent to the empty bottle, then swirl the mixture. Separately, combine the yeast with a few tablespoons of warm water and stir until mixed. Put the funnel in the top of the bottle, add the yeast mixture and watch the foam. The bottle will get a little hot (the reaction is exothermic).


    The reaction occurring is hydrogen peroxide decomposing into water and oxygen:
    2H2O2 → 2H2O + O2

    The bubbles are caused by the detergent capturing the oxygen. The foam is water and the colouring is made by the food colouring. The yeast is acting as a catalyst. The first few times I tried this, I was using yeast well past its used by date, and it didn't work very well, so make sure your yeast is relatively fresh. Yeast contains an enzyme called catalase. Catalase is found in nearly all organisms exposed to oxygen, and helps prevent cell damage caused by the by-products of oxygen metabolism. It actually catalyses this hydrogen peroxide reaction in living organisms.

    I did this outside on our grass, and as the by-product is water, it is safe to have on the lawn. If you are inside, make sure you have a tray to capture the toothpaste as it squeezes out. Wearing gloves minimises the chances of your skin coming in contact with hydrogen peroxide. 

    If you want to make the reaction more vigorous - in which case you have to wear proper safety gear - then you can use potassium iodide as the catalyst. But you might not have that lying around the house. There is some more info here.

    Science for kids - detergent powered boats

    This is an easy one, assuming you occasionally clean your dishes. You just need some bread ties, water and detergent. The video is a little unimpressive, but you could dress the bread ties up to make them look like boats.


    Essentially, the detergent is breaking the surface tension of the water, and if you break the surface tension behind the bread tie, the tension in front of the tie pulls it forward. Detergents are surfactants, which means they have a polar end (which is attracted to water) and a non-polar end (which is attracted to oil and grease). This is how detergents (and soaps) bond to both oil and water and hence wash your dishes. Water, without detergent, has a strong surface tension, which is created by the water molecules bonding to each other through Hydrogen bonds. The polar end of the detergent breaks the water surface tension by interfering with the hydrogen bonds at the surface - interestingly, the non-polar ends of the detergent, being hydrophobic, stick up into the air.

    Science for kids - Water Rocket

    Water rockets are one of the classic science demonstrations for kids - exciting, a bit of danger and some interesting science. Make sure you have plenty of space - making this video, I managed to get the rocket to hit the road, a swing set (with no one in it, thankfully) and some trees. We moved to the middle of a cricket field as the rockets can really go a long way. You can buy water rocket kits at toy or sciencey-styled stores. You need to provide a drink bottle, a bike pump and some water.


    The science is quite simple. Using the bike pump, you pump air into the bottle (which already contains some water), increasing the pressure of the air (storing potential energy) until the seal on the rocket bursts. The high pressure air forces water out the bottom of the rocket, which propels the rocket forward. This is an example of Newtown's third law of motion (commonly known by the expression: for every action, there is an equal and opposite reaction).  

    Thursday 8 January 2015

    Science for kids - Coloured flowers

    This is quite a simple one. Grab some carnations (or other white flowers), a vase, some food colouring and water. Add a generous amount of colouring to the water (20-odd drops), add the flowers, and wait. It can take longer than a day, especially if you haven't quite added enough colouring, so be patient. Here are some shots we took of our red and blue flowers (I reckon you can be more impressive than this!):


    The flowers turned blue quicker than red for me, and others have seen similar things (anyone know why?)

    The science on display is the capillary action of the water - that is, how the flower drinks even without its roots. This ability draws water against the force of gravity up the stem and into the petals. It works because the water evaporating from the petals and leaves of the plant "pulls" water up the narrow tubes in the stem (the xylem) to replace that which is lost. The tubes need to be narrow so that the combination of the surface tension of the water (caused by cohesion in the water - how well it sticks to itself) and the adhesive forces between the water and the walls of the xylem are strong enough to lift the water against the force of gravity. The adhesive forces are proportional to the diameter of the tube, whilst the weight of the water is proportional to this diameter squared - hence a smaller diameter favours the adhesive forces.

    Something funky to try is to split the stem and put one half in blue and the other in red. You can get multi-coloured flowers.

    Tuesday 6 January 2015

    Ep 156: Science for kids - home-made lava-lamp

    This Christmas break, I have been mucking around with science experiments for my kids. Here is the first of a few easy experiments you can try at home.

    The following videos show you how to make a home-made lava lamp. It is very simple - grab a clear cup (or bottle or vase or flask), fill it about a third full of water and two thirds full of oil. The oil floats on the water as it has a lower density. Add some food colouring (you can do this at the start directly to the water, or after you have added the oil - this has the added benefit of showing that the food colouring does not dissolve in the oil, so it drops through the lower density oil to the water below).

    You may already have Alka Seltzer in your medicine cabinet - it is an over-the-counter pain reliever containing Citric acid and Sodium bicarbonate (also known as baking soda). Split the alka seltzer tablets into about 4 bits, and add them to make your lamp. See the videos below for what happens.

    Shorter version:

    Longer version:

    The reaction that is occurring is:

    Citric Acid + Sodium bicarbonate → Sodium citrate + Carbon dioxide + Water
    C6H8O7 + 3NaHCO3 → Na3C6H5O7 + 3CO2 + 3H2O

    Or more simply:
    3H++ 3HCO3-  → 3CO2 + 3H2O

    Note, if you don't have alka seltzer, you can try baking soda, but add some vinegar to the original water mix, as vinegar is acidic and provides the H+.

    When you add the alka seltzer to the water, the citric acid and sodium bicarbonate start to dissolve, which allows the reaction to start and is why they don't react in solid form in the tablet.

    The reaction produces gaseous carbon dioxide, which has a lower density than both water and oil, and hence rises through the layers. When the gas bubbles exit the water into the oil, they trap and pull up a small amount of water with them. When the bubbles reach the surface, they burst and the water falls back through the oil. It's worth looking at this closely, as you will observe coloured water droplets that don't have quite enough CO2 stuck to, or dissolved within, them to make it all the way to the surface, and so they float around, buffeted from side to side by other, more vigorously moving, droplets.

    Here's some more over at CSIRO.